
Earlier this year I discovered AMPRNet, a large IP space on the internet reserved for Amateur Radio use. Intrigued, I decided to see how it all worked, so I set out to build my own AMPRNet IPIP Gateway on a Raspberry Pi to serve up my own /27 network space. I had some difficulty setting it up alongside my home network, so I documented how I built it hoping it will help others who are also interested.
These instructions detail how I built my AMPRNet IPIP gateway, which includes all the routing, firewall (to protect itself along with the local AMPRNet network), and a pi self-update script. I found this a very fun project, however it took me a while to accomplish with life getting in the way. While I have posted a bit more details of my entire home network on my networking page, the image below shows a simplified view of how my AMPRNet gateway fits along side a home network.
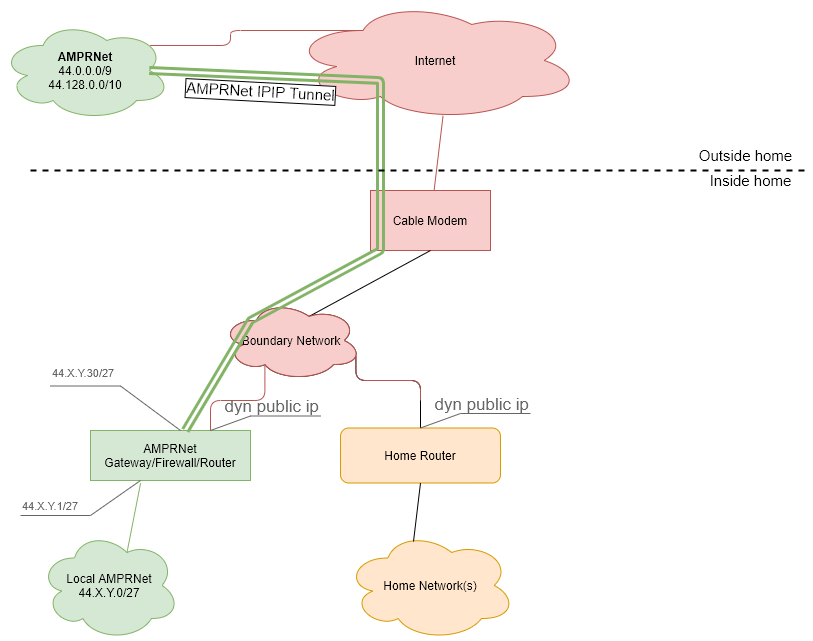
The boundary network can be accomplished in many ways (such as using a simple switch), but it also assumes your ISP will provide you with more than one dynamic IP. Also, in the image above, it shows a generic AMPRNet network with the CIDR notation of 44.X.Y.0/27. This is because I have a /27 network on AMPRNet that ends in .0. Keep this in mind when going though the documentation as only you know your own network allocation.
Step 1: Verify Prerequisites
These instructions assume a few things. Please pay careful attention to this section.
- You require to be a licensed Amateur Radio operator to have an AMPRNet network assigned to you.
- You require to have an approved AMPRNet network.
- In order to get an AMPRNet gateway assigned, you can visit the AMPRNet website, and request a network segment via the AMPRNet portal.
- In this documentation, your local AMPRNet network is referred to 44.X.Y.Z/BITMASK. You will need to replace this with your network segment throughout. I assume you have a base level of network knowledge, or you would not be attempting to build this gateway.
- In order for traffic to flow to/from the internet to/from your AMPRNet assigned network, you must have your client hosts in AMPR’s forward/reverse DNS. If this is not done, you can still connect to AMPRNet, and traffic will still flow to/from your segment to the rest of AMPRNet, but it will not cross over to the internet, and internet traffic cannot route to you.
- This documentation assumes you have two networking interfaces on your Pi. One for the public internet, and one for your local AMPRNet. I leveraged VLAN tagging to create a separate virtual interface for my local AMPRNet. I do not cover how to configure VLAN Tagging on Linux, but there are lots of documentation that exists if you wanted to do this (assuming you have a capable switch/router).
- This documentation assumes you have a dynamically assigned public IP on the public interface of your Pi. If you do not, and you have access to a static public IP, skip step 3. I am lucky that my ISP will allow me to have multiple public IP’s on my premises. So I have my home network, and my AMPRNet network behind my cable modem, each with their own public IP (as per the picture above).
- Finally, it is worth noting not all ISP’s allow IP protocol 4 (IPIP tunneling). IPIP tunneling is required for this configuration.
Step 2: Pi initial configuration
Before we dig right into the configuration of the AMPRNet gateway, there are a few housekeeping items required. First, make sure you install AMPR-RIPD (I used version 2.4). As the AMPRNet is a distributed network, you will require keeping your 44 net routing table up to date, which is what AMPR-RIPD does for you. We use this networking daemon in the script located in Step 5.
Another consideration is the security of this Pi. It will, after all, be directly connected to AMPRNet and likely you will add it to AMPRNet DNS so the internet will also have access to it, so we need to be sure to keep it up to date. Follow best practices here, use strong passwords and consider using SSH Keys. While the below script won’t solve all of your security concerns, it will auto-update your Pi software and reboot. I have it saved in the executable file at /root/bin/updatePi.sh and call it on a weekly basis with CRON. I suggest you do the same.
#!/bin/sh
apt-get update && apt-get full-upgrade -y

apt-get autoremove -y
apt-get autoclean -y
reboot
The cronjob I used to execute it weekly looks like this (runs every Monday morning at 2am)
0 2 * * MON sh /root/bin/updatePi.sh 2>&1 > /dev/null &Step 3: “Fixing” the dynamic IP problem
One problem I could see running into when starting this project is, “What happens when my public dynamic IP changes on the gateway”. The answer, or course, is that my IPIP tunnel to the rest of AMPRNet will break. I could, and did, fix this by leveraging an external DNS service that I can update automatically from the Pi. I have used Cloudflare in the past to host DNS various domains, so I used it to host a single entry for my AMPRNet gateway that I can then update via the CloudFlare API.
First, make sure that the AMPRNet portal has this hostname associated with your gateway, instead of my IP. The hostname is “re-resolved” hourly by the core AMPRnet services, and with setting your DNS entry to have a TTL of only two minutes it means that your AMPRNet will only be offline for only a bit over an hour if your public IP changes. While it’s not ideal, it is good enough for me and much cheaper than paying for a static IP from my ISP.
There are other Dynamic DNS services out there as well (other than CloudFlare), so use the one that works for you. If you use Cloudflare, the following script is what I used to update my IP. Note that you require a few things from Cloudflare to make this work, and they are all the variables that you need to fill out at the top of this script. Consult Cloudflare on how to generate these required items (API token, etc.). As we require no special permissions for this script, I placed it in the pi home folder in an executable file at /home/pi/cloudflare_ip_update/cloudflare_ip_update.sh and run it every 5 minutes with cron. Oh, one more thing, I assume your public interface is eth0, you will need to change this if required.
#!/bin/bash

lastipfile=/home/pi/cloudflare_ip_update/lastip    # File that caches last/current IP
cf_zoneid="ENTER YOUR ZONE ID HERE"
cf_dnsrecordId="ENTER YOUR DNS RECORD ID HERE"
cf_dnsHostname="ENTER YOUR DNS HOSTNAME HERE"
cf_apiToken="ENTER YOUR API TOKEN HERE"
cf_authEmail="ENTER YOUR AUTH EMAIL HERE"
external_interface="eth0"                     # External interface that has dyn IP

#Find my current IP
ipv4=$(/sbin/ip -o -4 addr list $external_interface | awk '{print $4}' | cut -d/ -f1)

#Get Last IP
lastip=`cat $lastipfile`

if [ "$ipv4" == "$lastip" ]; then
   echo "IP Has not changed, not updating"
   exit 0;
fi

echo "IP Changed, updating CF DNS"
echo $ipv4 > $lastipfile

generate_post_data()
{
  cat <<EOF
{
  "type":"A",
  "name":"$cf_dnsHostname",
  "content":"$ipv4",
  "ttl":120,
  "proxied":false
}
EOF
}


# Echo to the screen what we are submitting
echo $(generate_post_data);

# Update the CloudFlare DNS
curl -X PUT "https://api.cloudflare.com/client/v4/zones/$cf_zoneid/dns_records/$cf_dnsrecordId" \
     -H "X-Auth-Email: $cf_authEmail" \
     -H "X-Auth-Key: $cf_apiToken" \
     -H "Content-Type: application/json" \
     --data "$(generate_post_data)"
Here is the crontab entry I used to run this every 5 minutes. Again, this is run as the Pi user, so it’s in the Pi’s crontab, not root’s.
*/5 * * * * /home/pi/bin/cloudflare_ip_update.sh 2>&1 > /dev/nullStep 4: Interface IP assignments
With this configuration, you will burn up two of your AMPRNet IP’s on your gateway. The first one is for the local tunnel interface, and the second is the IP address you will use on your local AMPRNet interface. The one you use on your local interface will become the gateway address for your clients. I used the last usable IP in my AMPRNet assignment for my tunnel interface, and the first usable IP for my local interface. As I have a 44.X.Y.0/27 network, I used the following IP addresses for these interfaces:
- Tunnel Interface: 44.X.Y.30/32
- Local AMPRNet Interface: 44.X.Y.1/32
Clients on my local AMPRNet can then use the 44.X.Y.1 address as their local gateway.
So go ahead and configure the local AMPRNet interface (not your public interface, as referred to in step 3) with a local AMPRNet interface. I did this by editing my /etc/dhcpcd.conf file and added the following lines, which will make the change persistent across reboots. You will need to replace the static IP address with whatever address you choose. Also note that eth0.44 is my local interface for my AMPRNet network – change this to your local AMPRNet interface.
## AmprNet 44 Address
interface eth0.44
static ip_address=44.X.Y.1/27
metric 100
We assign the tunnel interface IP in the script described in the next section, Step 5, when you create the tunnel.
Step 5: Creating the tunnel, routing rules, and firewall – with a service
To create the tunnel, routing rules, and firewall rules, I created a simple systemd service. The service, which I called amprgwSvc, contains two scripts – one for enabling the service and one for disabling the service. There are several variables you need to configure at the top of the script detailed below, and the variable ampr_ripd_password needs to be determined by you. You can get the value of this variable by simply running the following commands (replace the 44.X.Y.30/32 with your address that you will use for your tunnel):
# Create and enable the tunnel interface.
modprobe ipip
ip addr add 44.X.Y.30/32 dev tunl0

ip link set dev tunl0 up
ifconfig tunl0 mtu 1480

# Find the Password for the AMPR-RIP.
ampr-ripd -d -i tunl0
After 5 minutes, as the RIPD protocol does its magic, the password should display on your screen. Once you have it, plop it in the script below with the other variables at the top of the Script. I saved this to the executable file at /etc/amprgwSvc/enable_amprgw.
#!/bin/bash

#####
# Variables
#
my_ampr_network="44.X.Y.Z/BITMASK" # This is your CIDR AMPRNet Network segment
my_ampr_tunnel_ip="44.X.Y.Z/32"    # This is your Tunnel IP Address
ampr_ripd_password="thePassword"   # Enter the RIPD AMPRNet password
external_interface="eth0"          # External interface address
internal_interface="eth0.44"       # Internal interface address

###################################################################
##    PART I  -- Enable IPIP Tunnel, Forwarding and Routing      ##
###################################################################

# Enable IP Forwarding
sysctl -w net.ipv4.ip_forward=1

# Enable IPIP tunnel and interface
modprobe ipip
ip addr add $my_ampr_tunnel_ip dev tunl0

# Set some tunnel interface options
#    * Give the tunnel its own TTL of 64 hops enabling traceroute over the tunnel
#    * Bring up the interface
#    * Set the tunnel MTU
ip tunnel change ttl 64 mode ipip tunl0
ip link set dev tunl0 up
ifconfig tunl0 mtu 1480

# Set AMPRNet routing table rules
#    * Any packets from any AMPRNet space use routing table 44
#    * Any packets from my AMPRNet space use routing table 44
ip rule add to 44.0.0.0/9 table 44 priority 44
ip rule add to 44.128.0.0/10 table 44 priority 44
ip rule add from $my_ampr_network table 44 priority 45

# Set AMPRNet routes
#   * Default route out of AMPRNet is 169.228.34.84 (The Central AMPR Gateway)
#   * Set local route for AMPRNet on local AMPRNet interface
ip route add default dev tunl0 via 169.228.34.84 onlink table 44
ip route add $my_ampr_network dev $internal_interface table 44

# Rest of the routes are added dynamically by the AMPR-RIPD routing Daemon.
/usr/sbin/ampr-ripd -s -r -t 44 -i tunl0 -a $my_ampr_network -p $ampr_ripd_password

###############################################################
##    PART II  -- Enable Firewall and configure ruleset      ##
###############################################################

# Start Fresh - Flush all rules
iptables -F
iptables -X

# Setting default filter policy
iptables -P INPUT DROP          # By default drop all incoming connections
iptables -P FORWARD DROP        # by default drop all forwarding connections
iptables -P OUTPUT ACCEPT       # By default allow outgoing connections


# This prevents nested ipencap (if its coming from the tunnel, dont allow protocol 4)
iptables -t raw -I PREROUTING -p 4 -i tunl0 -j DROP

####################################################################
## Rules for traffic leaving this gateway node, AKA OUTPUT chain. ##
##       That is, any traffic leaving from any local IP           ##
####################################################################
# Drops destination unreachable replies to various probe responses
iptables -A OUTPUT -p icmp --icmp-type destination-unreachable -j DROP

## Allow rest outgoing traffic from this gw
iptables -A OUTPUT -j ACCEPT


###################################################################
## Rules for traffic leaving this gateway node, AKA INPUT chain. ##
##        That is, any traffic destined to any local IP          ##
###################################################################

# Allow tunnel traffic (ip proto 4) on external interface
iptables -p 4 -A INPUT -i $external_interface -j ACCEPT

# Allow unlimited traffic on loopback and local eth 44 Net adapters
iptables -A INPUT -i lo -j ACCEPT
iptables -A INPUT -i $internal_interface -j ACCEPT

# Allow established sessions to receive traffic back
iptables -A INPUT -m conntrack --ctstate ESTABLISHED,RELATED -j ACCEPT

# Allow incoming ssh/icmp/ampr-ripd
iptables -A INPUT -p tcp --sport 1024:65535 --dport 22 -m state --state NEW,ESTABLISHED -j ACCEPT
iptables -A INPUT -p icmp -m state --state NEW,ESTABLISHED -j ACCEPT
iptables -A INPUT -p udp --dport 520 -j ACCEPT

# drop the rest
iptables -A INPUT -j DROP


#####################################################################
##      Forwarding for traffic passing though this gateway         ##
## That is, any traffic going to or from the local AmprNet segment ##
#####################################################################
# This prevents a general loop - If the traffic comes in the tunnel, dont send it back out the same way
iptables -I FORWARD -i tunl0 -o tunl0 -j DROP

# Drop any traffic leaving via the tunnel that is not from the local AmprNet
iptables -I FORWARD ! -s $my_ampr_network -o tunl0 -j DROP

# Allow established sessions to receive traffic
iptables -A FORWARD -m conntrack -d $my_ampr_network --ctstate ESTABLISHED,RELATED -j ACCEPT

## Allow ssh/icmp connections to my AmprNet
iptables -A FORWARD -p tcp --sport 1024:65535 -d $my_ampr_network --dport 22 -m state --state NEW,ESTABLISHED -j ACCEPT
iptables -A FORWARD -p icmp -d $my_ampr_network -m state --state NEW,ESTABLISHED -j ACCEPT

# Drop unwanted traffic from leaking out-or coming in (smb discovery, etc)
iptables -A FORWARD -p udp --dport 10001 -j DROP
iptables -A FORWARD -p udp --dport 137:139 -j DROP
iptables -A FORWARD -p udp --dport 5678 -j DROP
# Drops destination unreachable replies to various probe responses
iptables -A FORWARD -p icmp --icmp-type destination-unreachable -j DROP

# Finally, allow outgoing connections from the local AmprNet
iptables -A FORWARD -s $my_ampr_network -j ACCEPT

# Anything else, drop it
iptables -A FORWARD -j DROP
This script does three fundamental things:
- Creates an AMPRNet tunnel (interface tunl0)
- Creates a routing table for AMPRNet (table 44)
- This routing table is updated dynamically using the AMPR-RIPD daemon.
- Configures and enables a basic firewall using iptables that is configured as follows:
- It operates the same as a home router does with connection tracking. Any outbound established traffic can receive the traffic coming back; Otherwise, incoming traffic is dropped by default.
- SSH and Ping are explicitly allowed to connect to the gateway itself, as well as hosts on the network.
- If you have any specific ports you want opened up to your clients, add them in the “## Allow ssh/icmp connections to my AmprNet” section. For example, I have added a rule allowing destination port 80 to my D-Star hotspot, which allows me to see the dashboard remotely (not shown in above script).
The disabling script essentially just reverts everything. It tears down the tunnel and disables the iptables firewall. Here is the script, which I stored in the executable file that I saved at /etc/amprgwSvc/disable_amprgw.
#!/bin/bash

#####
# Variables
#
my_ampr_network="44.X.Y.Z/BITMASK"   # My CIDR AMPRNet Network
internal_interface="eth0.44"         # Local AMPRNet Interface

### DISABLE IP FORWARDING ###
sysctl -w net.ipv4.ip_forward=0

### Take the tunnel offline ###
ifconfig tunl0 down

### Remove the table 44 routes ###
ip route delete default dev tunl0 via 169.228.34.84 onlink table 44

# Deletes local 44 network to Table 44
ip route delete $my_ampr_network dev $internal_interface table 44

########################################
### STOPS THE ampr-ripd ROUTER DAMEON
killall -KILL ampr-ripd

########################################
# reset the iptables firewall
# Flushing all rules
iptables -F
iptables -X

# Setting default filter policy
iptables -P INPUT ACCEPT        # By default allow all incoming connections
iptables -P FORWARD ACCEPT      # by default allow all forwarding connections
iptables -P OUTPUT ACCEPT       # By default allow outgoing connections
Test everything. Easiest way is to execute the enable and disable scripts as root to confirm it brings up and takes down the gateway. The next step is to make it a service and enable it to run on boot. To do this, create a service file called /etc/systemd/system/amprgw.service with the following contents:
[Unit]
Description=AmprGwService
After=network-online.target
Wants=network-online.target


[Service]
Type=oneshot
RemainAfterExit=true
ExecStart=/etc/amprgwSvc/enable_amprgw
ExecStop=/etc/amprgwSvc/disable_amprgw

[Install]
WantedBy=multi-user.target
Then, enable the service with systemctl:
systemctl enable amprgwFuture considerations
Some future considerations I may explore include
- Installing OpenVPN on the gateway to allow for remote access into my local AMPRNet, leveraging my AMPRnet IP’s.
- Adding DHCP to the AMPRNet gateway to provide dynamic addressing within my AMPRnet network.
- Adding a DNS resolver for the local AMPRNet clients.
Credits
While the scripts on this page I wrote, I borrowed a lot of the concepts and snippets from various sources on the internet. While this is likely not an extensive list of references as this project spanned many months and I am only writing the documentation now, these are a few I remember consulting.
Did this documentation help you? Confuse you? If so, please leave a comment below.
Extremely well written. Best tutorial on getting things set up on an RPI4 for sure. Thanks so much for sharing!
I am glad you have found it useful. I really need to do up documentation for all my other projects I have done, like my custom APRS WX station–but it will likely be over the holidays before I get around to it. 73
GREAT job documenting this process! I’ve been struggling for weeks trying wrap my mind around all of the necessary configuration. I’ll begin again with a better understanding of what needs to be done and how. Thanks for taking time to share your expertise. I look forward to seeing more about your other projects.
Thanks John, I am glad you found this information useful!
Thanks for the really nice write-up. It really breaks down the process.
If your ISP does issue more than one dynamic public IP. I presume placing an assigned IP on your “home router” into ‘DMZ’ would work as long as the router does not block the IPIP traffic?
I assume you mean “If your ISP does not issue more than one dynamic public IP…” ? Yes, if you have a router that will forward IP Protocol 4 (IPIP) to a DMZ host, that would work. However, most home routers would not support this. In fact, I have an older business class cisco router (RV325) and I found no way to forward this IP protocol beyond the router.
However, now that I think about it, I suppose there is a way around this: Use the pi as your home gateway too. The way it would work is that all internet traffic would hit the Pi, and then route the traffic to either your AMPRNet network or your home router (home network). This would require another interface on the Pi and the corresponding IP table rules to allow your non-AMPRnet traffic to flow through. Hmm… sounds like a fun project.
Ubiquity EdgerouterX (I presume all the ER’s) can DNAT protocol 4.
1. Firewall rule on WAN_IN to accept ‘protocol 4’ on WAN
2. DNAT ‘protocol 4’ from WAN port to
As soon as that was added the 700 odd routes came flooding into the GW.
Thanks!
That’s great, I must look into one of those routers.
Well, don’t get your hopes up … it sort of works. You can ping devices on the local amprNet, but not traceroute to (stops at tunnel IP). I used YO2TM’s handy network tools [http://yo2tm.ampr.org/nettools.php] . Also had someone else confirm from 44net side.
I enabled telnet in IP tables (for JNOS access). It shows open when you run nmap on the gateway IP… But you can’t telnet to from 44net.
I’m guessing it’s the erX in the path that’s causing the issue. Interestingly the AXIP wormhole I have built in JNOS is working fine… hmm Maybe DNAT rules for every service is needed on the erX. But I thought that traffic would be tunneled.
Hi,
I setup my amprnet gateway based on these instructions. I also had an issue because I am running the UDM pro at home. I tore apart my entire network and replaced it with a TPlink ER-605 and was easily able to dmz the traffic to the pi. I am curious, did you configure the vpn side yet? I would like to do this myself and have started experimenting with it.
That’s really interesting. I have not configured the VPN yet, no – but I am also just rebuilding my network and have chosen TP-Link Gear. I must try the DMZ forwarding to the Pi to see how it works.
Hello – this is a fantastic tutorial which I’ll try shortly. With little prior training I attempted this (using most of the sources you’ve collected) 2+yrs ago and failed dismally although learned quite a bit along the way. It led me to rebuild my home network using the TPlink ER-605 and omada sdn (highly useful for other things) where I was attempting to dmz the 44net traffic and then put it through a vlan. At the time (2019) it was rudimentary but much of the capability has now been built into UIs for non-CLI’ers like me so I’m keen to have another go.
I wish would would elaborated on the VLAN part. What network switch you use and how you have it tagged etc. Most folks just run flat networks so this is new to them.
Hi Robert,
Thanks for your interest. You are right, most people run a flat network and are not bothered by VLANs. As such, the article here is written assuming you have two separate interfaces – one internal (Your AMPR network), and one external (internet connection). However, this doesn’t change much with VLANS. In my environment I use one physical cable and use VLANs to create two virtual networks, one acts as the external network, and the other one acts as the internal network. I do not go into how to create and run VLANs here because that is not the focus of the article–the focus is how to build an AMPRnet gateway using the IPIP protocol on a Raspberry Pi. There are many articles out there explaining VLANS including how to manage and create them on a Raspberry Pi. If you wanted to do this, of course, you will need a VLAN capable router and have good networking knowledge.